The Perfect Pear Galette
A pear galette is the ultimate rustic dessert for anyone who loves the warm, cozy comfort of a fruit pie without the stress of perfect edges or special pie pans. There is something truly magical about capturing the essence of the orchard in a buttery, flakey pastry that folds over soft, cinnamon-kissed fruit as it bakes until golden perfection. Because I believe the best kitchen memories are made when the pressure to be perfect is left at the door, this free-form pie has become a staple in my home, reminding me that simplicity is often the secret ingredient to joy.
Whether you are hosting a casual Sunday dinner with loved ones or craving a quick treat after a long day, a pear galette brings that wonderful aroma of spice and fruit directly into your living space. It celebrates the versatility of the pear, allowing its natural, elegant sweetness to shine through while the crust provides a satisfying, buttery crunch in every delicious bite.
What is a Pear Galette?
A galette is essentially a free-form, rustic French pastry that avoids the need for a pie dish or fancy crimping techniques. Unlike traditional double-crust pies that require precision, a galette relies on a single sheet of dough that is draped over your favorite seasonal filling, then folded toward the center to create a charming, imperfect layer of pastry around the edges. It is authentic, rustic, and approachable for every level of home cook.
The anatomy of this dish relies on a crisp pastry shell protecting a center of fresh, peeled, and sliced pears that are tossed in warm spices like cinnamon and ginger. When baked, the fruit releases its juices, which mingle with the sugar and spices to create a light, bubbling caramel that soaks slightly into the bottom of the crust for an incredible contrast of textures and flavors.
Reasons to Try This Pear Galette
You will love this recipe because it removes the intimidation factor often associated with baking. By using a pre-made crust, you get all the buttery, flaky satisfaction of a time-consuming project in a fraction of the time. It is perfect for busy parents, beginners wanting to build kitchen confidence, or anyone who simply appreciates a beautiful dessert that looks like it came from a professional bakery.
Beyond the ease of preparation, this dessert is exceptionally versatile. It works wonderfully for holiday tables, quiet gatherings, or even a simple treat on a busy weeknight. It invites you to get creative with your fruit combinations or spice preferences, ensuring that this recipe remains a living part of your culinary journey as you experiment with what tastes best to you and your family.
Ingredients Needed to Make This Pear Galette
- 1 refrigerated pie crust (room temperature)
- 3-4 ripe Bartlett or Anjou pears, peeled and thinly sliced
- 1/4 cup granulated sugar
- 2 tablespoons flour or cornstarch (to thicken the juices)
- 1 teaspoon ground cinnamon
- 1/4 teaspoon ground ginger
- 1/4 teaspoon salt
- 1 tablespoon fresh lemon juice
- 1/2 teaspoon fresh lemon zest
- 1/2 tablespoon cold butter, cut into small pieces
- 1 egg, lightly beaten for brushing
- Coarse turbinado or granulated sugar for sprinkling
Instructions to Make This Pear Galette – Step by Step
Step 1: Start by preheating your oven to 400 degrees Fahrenheit and preparing a rimmed baking sheet with a piece of parchment paper or a silicone mat for easy cleanup. Set the sheet aside so it is ready the moment your pastry is prepared.
Step 2: Allow your refrigerated pie dough to sit out briefly, then roll it out into an 11-inch circle between two sheets of lightly floured wax paper to keep it from sticking. Lift the dough carefully onto your prepared baking sheet, cover it, and let it rest in the refrigerator for about 15 to 30 minutes to ensure it holds its shape perfectly while baking.
Step 3: While the dough chills, combine your sliced pears in a large bowl with the sugar, flour, cinnamon, ginger, salt, lemon juice, and zest. Toss these components together gently until the pears are evenly coated, ensuring you do not bruise the fruit.
Step 4: Arrange your seasoned pear slices in the center of the dough, mounding them slightly higher in the middle while leaving about a two-inch border all around. You can lay them out in a neat spiral pattern if you want to be artistic, or simply heap them in a messy, rustic pile for that classic farmhouse feeling.
Step 5: Fold the outer two-inch edges of the crust up and over the fruit, overlapping the dough as needed. It does not have to look like a machine made it; those little folds actually create beautiful, crispy texture points that we love to see on a home-baked tart.
Step 6: Dot the top of the fruit with the small pieces of cold butter for extra richness. Brush the exposed edges of the dough with your beaten egg, and sprinkle the entire thing with a little extra sugar to give the crust a beautiful, glistening finish once it emerges from the oven.
Step 7: Bake the galette for approximately 20 minutes, keeping an eye on the crust until it turns a deep, appetizing golden brown. Pull it out and transfer the whole sheet to a wire rack to cool for at least 20 minutes, giving the juices inside a chance to settle before you slice into it.
Chef’s Tips for a Perfect Result
- Keep your butter cold: Using cold pieces of butter on top of the fruit ensures they melt slowly, creating a luxurious base for the filling.
- Chill the dough: Letting your dough rest in the fridge before baking prevents the crust from shrinking in the oven and helps it stay incredibly flakey.
- Don’t overfill: While it is tempting to pile in extra fruit, keep a steady border so the crust has enough room to fold over properly.
- Use ripe fruit: Pears that are slightly soft and ripe offer the best sweetness, though they should be firm enough to hold their shape during the baking process.
Variations and Substitutions
- Vegan Option: Use a plant-based store-bought crust and swap the butter for chunks of a vegan margarine, and use a splash of almond milk instead of the egg wash.
- Gluten-Free Alternative: Substitute the standard crust with a gluten-free pie dough mix and ensure your thickener is cornstarch rather than flour.
- Apple Swap: If you prefer, replace the pears with sliced apples, though please note that you should increase the bake time by about 10 to 15 minutes as apples take longer to soften.
How to Serve and Pair
This galette shines best when served warm, ideally with a generous scoop of classic vanilla bean ice cream that begins to melt slightly into the spiced fruit. For a lighter touch, a dollop of fresh whipped cream or a drizzle of warm honey adds a lovely finishing note. It makes the perfect end to a Sunday afternoon meal or a companion to a mid-day cup of black tea or coffee.
Storage and Reheating
Refrigerator
Keep leftovers in an airtight container for up to three days. While the crust will soften slightly over time, the flavor remains delicious.
Freezer
You can freeze an unbaked, assembled galette for up to two months. Simply wrap it well in plastic and foil, then bake straight from frozen, adding an extra five to ten minutes to the total time.
Reheating
The best way to revive the crisp crust is to place the galette in a 350-degree oven for about 10 minutes. Avoid the microwave, which tends to make the pastry soggy rather than flakey.
Frequently Asked Questions (FAQ)
Can I use apples instead of pears in this galette?
Yes, you can easily swap the pears for thinly sliced apples. Just keep in mind that apples are denser and will require an additional 15 minutes of baking time.
How do I know when the galette is fully baked?
Your galette is finished when the crust turns a rich, deep golden brown and the fruit filling appears soft and visibly bubbling.
My crust is soggy on the bottom, what happened?
A soggy crust usually occurs when the fruit releases too much liquid that isn’t absorbed or if the oven was not hot enough. Adding a sprinkle of almond flour or crushed graham crackers beneath the fruit can help absorb excess moisture.
Can I assemble this dessert ahead of time?
You can prepare the filling and refrigerate the rolled dough separately for up to 24 hours. Assemble the galette right before you are ready to put it in the oven to ensure the best texture.
What is the best way to customize the flavor?
You can introduce new layers of flavor by adding a teaspoon of pure vanilla extract or a pinch of cardamom to the fruit mixture. These small additions complement the inherent sweetness of the pears wonderfully.
Conclusion
A pear galette is a testament to the beauty of simplicity in the kitchen, proving that home-cooked desserts shine brightest when they are made with love and ease. This recipe offers a reliable, delicious way to bring friends and family together for a moment of shared sweetness. With its buttery, golden crust and spiced, tender fruit, you will find it nearly impossible to resist reaching for that second slice.
Print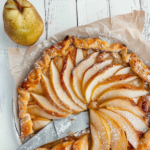
Rustic Pear Galette
- Prep Time: 15
- Cook Time: 35
- Total Time: 50
- Yield: 8 servings 1x
- Category: desserts
- Method: Baking
- Cuisine: French-American
- Diet: Vegetarian
Description
Indulge in this effortlessly charming, French-inspired rustic pear galette. By embracing a free-form design, this dessert eliminates the need for fancy crimping or pie pans. Thinly sliced Bartlett or Anjou pears are tossed in aromatic cinnamon and ginger, then nestled into a golden, buttery, flaky crust. It is the perfect weeknight treat that brings the quintessential orchard experience directly to your kitchen table with minimal effort and maximum comfort.
Ingredients
1 refrigerated pie crust, room temperature
3–4 ripe Bartlett or Anjou pears, peeled and thinly sliced
1/4 cup granulated sugar
2 tablespoons flour or cornstarch
1/2 teaspoon ground cinnamon
1/4 teaspoon ground ginger
1 egg, lightly beaten for egg wash
1 tablespoon turbinado sugar for sprinkling
Instructions
Preheat your oven to 375°F (190°C) and line a baking sheet with parchment paper.
In a medium bowl, toss the sliced pears with sugar, flour or cornstarch, cinnamon, and ginger until evenly coated.
Roll the pie crust out on the parchment-lined baking sheet.
Arrange the pear slices in the center of the dough, leaving a 2-inch border around the edges.
Fold the edges of the dough over the pears, pleating as you go to create a rustic, circular border.
Brush the crust edges with the beaten egg and sprinkle with turbinado sugar for extra crunch.
Bake for 30-35 minutes, or until the crust is golden brown and the pear juices are thick and bubbly.
Allow to cool slightly before slicing and serving.
Notes
Serve warm with a scoop of vanilla bean ice cream or a dollop of fresh whipped cream. Store any leftovers in an airtight container at room temperature for up to two days. For a deeper flavor, you can swap half the granulated sugar for brown sugar.
Nutrition
- Serving Size: 1 slice
- Calories: 210
- Sugar: 14g
- Sodium: 115mg
- Fat: 9g
- Saturated Fat: 4g
- Carbohydrates: 31g
- Fiber: 2g
- Protein: 2g
- Cholesterol: 20mg